Sure, here's the translation of the text into simplified Chinese while keeping the HTML structure intact: ```html
使用Jupyter Lab IDE、Typescript、LangChain.js和Ollama创建AI原型环境,以实现快速的AI原型设计。
``` This HTML snippet preserves the structure while presenting the translated text in simplified Chinese.Sure, here's the text translated into simplified Chinese while preserving the HTML structure:
```html
Typescript 开发者的逐步指南
```

简介
Sure, here is the translated text in simplified Chinese while keeping the HTML structure: ```html
这是我关于AI辅助开发旅程的文章系列的第二部分。
```Sure, here's the translated text in simplified Chinese: 在这个系列的介绍部分中,我总结了最近的变化,使我们能够轻松地使用Typescript原型和开发AI应用程序。
Sure, here's the translated text: ```html
还没阅读第一部分吗?这个项目的核心是:在接下来的几个月,甚至可能几年里,我的目标是尝试新的AI模型和工具,并向您展示我一路学到的一切。我将大量进行“公开构建”,并向您展示我旅程中的重要里程碑。因此,您将能够将这些知识应用到自己的实践中。
``````html
在本文中,我将向您展示如何安装 Jupyter Lab IDE 以及我们的快速原型环境所需的所有工具。您只需要设置一次,我将逐步解释所有内容。完成设置后,您将能够跟随我并构建所有未来的实验。(所以这是值得的努力 :) )。
```Sure, here's the translation in HTML format: ```html
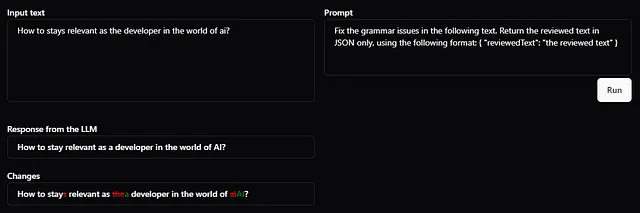
例如,在接下来的文章系列中,我将更详细地解释如何构建“文本审核应用程序”:
```
Sure, here's the translated text in simplified Chinese while keeping the HTML structure: ```html
我的工作流程和工具
```Sure, here is the text translated into simplified Chinese while keeping the HTML structure: ```html
我使用以下工作流程进行AI工具开发:
``` This HTML code represents the translated text "I use the following workflow for AI tool development:" in simplified Chinese.- Sure, here's the text translated into simplified Chinese while keeping the HTML structure:
```html
一个基于Typescript和Jupyter Lab的人工智能工具原型环境,用于快速原型化人工智能工具。
``` - Sure, here is the translated text in simplified Chinese, while maintaining the HTML structure:
```html
我扩展了原型的代码,从中创建了一个存储。在React应用中,我使用Zustand React存储,在Angular中我使用NgRx的SignalStore,在Jupyter Lab中,我使用Zustand Vanilla存储。这些存储解决方案有很多共同点,所以我可以重用相同的选择器、效果和更新器代码。
``` - Sure, here is the translated text in simplified Chinese while keeping the HTML structure:
```html
我构建了一个使用 Nx monorepo 中的 store 的 Angular 或 React 应用程序或智能组件。我在 React 应用中使用 Shadcn UI,在 Angular 应用中使用基于 Shadcn 的 spartan/ui,这样我就可以在 Angular 和 React 中几乎使用相同的应用程序架构。
```
Sure, here is the translated text in simplified Chinese while keeping the HTML structure: ```html
这些是我基于 TypeScript 的 AI 工具原型环境中最重要的工具:
```- Sure, here is the translation: ```html Jupyter Lab 网络交互式开发环境 ```
- Sure, here's the HTML structure with the translated text:
```html
Translated Text Deno Typescript/Javascript内核适用于Jupyter笔记本,它使我们能够在Typescript中创建Jupyter笔记本
``` - Sure, here's the translated text in simplified Chinese within an HTML structure:
```html
Ollama 用于在本地运行LLMs Ollama 用于在本地运行LLMs ``` Translated text: ```htmlOllama 用于在本地运行LLMs Ollama 用于在本地运行LLMs ``` - Sure, here's the translation in simplified Chinese:
```html
Langchain,一个由语言模型驱动的应用程序开发框架
```
Sure, here's the translated text in simplified Chinese: ```html 我还将解释如何安装以及以下软件包管理器的最重要命令: ```
- Sure, here's the translation:
```html
巧克力 Windows 软件管理解决方案,我们使用它来安装 Python 和 Deno```
- Below is the provided text translated into simplified Chinese while maintaining the HTML structure:
```html
Python的软件包安装程序(pip),我们使用它来安装基于Python的软件包,比如Jupyter Lab,以及安装其他基于Python的工具,比如Chroma DB向量数据库。
```
Sure, here's the translated text in simplified Chinese within the HTML structure: ```html
如果你按照这篇文章的步骤操作,你就能在你的本地 Jupyter Lab IDE(可下载的 Jupyter 笔记本)上运行“文本审阅应用程序”的原型,并且你也能够开始根据我的示例创建你自己的应用程序原型:
```
Sure, here's the translated text in simplified Chinese, while keeping the HTML structure:
```html
使用Jupyter笔记本与Typescript进行原型设计的好处是什么?
```
```html
最初,当我开始进行实验时,我创建了一个简单的Angular应用程序,并将所有实验性的人工智能代码编写在主组件的构造函数中,并在控制台上显示输出。我发现这种方法在进行简单实验时效果很好,当我对构建某物有明确的计划,并且不想尝试许多不同的模型、提示或代理网络时。然而,在更复杂的实验中,这种简单的方法有其局限性:
```- Sure, here's the translated text in simplified Chinese, keeping the HTML structure:
```html
整个实验代码一次性运行,如果我想将其拆分为多个部分并分别运行这些部分,我需要用户界面控件,或者我必须注释/取消注释代码的部分。在Jupyter中,我可以将代码分割成多个单元格,并运行所有单元格或部分单元格。
``` - 包管理:在Deno中,这是自动的,我只需编写一个导入语句,Deno就会自动下载和存储NPM或Deno包在后台。不需要package.json或node_modules目录。一旦Deno下载了特定版本的包,我们就可以在所有Jupyter笔记本中使用它。
- Sure, here's the translated text in simplified Chinese: 我们可以在Jupyter中简单地创建笔记本的副本。如果我要尝试一个新的AI工具,我只需克隆我的笔记本,例如更改提示或模型。然后我可以并行运行我的笔记本,并将结果进行对比。
- Sure, here's the HTML structure with the translated text:
```html
在Jupyter中,如果我需要使用RAG(检索增强生成,我们使用此技术来通过扩展其知识来优化LLM的输出,其附加信息外部于其培训来源),我可以直接访问包含额外知识的本地文件。我们也可以在Angular/React应用程序中做到这一点,但这更具挑战性,因为我们需要某种服务器来访问本地文件。
``` - ```html
使用Jupyter/Deno创建的Typescript代码是可移植的:我们可以在前端项目中使用它,但也可以在后端中使用代码。我相信,在实验阶段,Jupyter和Deno非常适合,而在原型设计阶段,我们应该创建一个Angular或React应用程序。这些原型可以有效地支持单个用户或较小团队的工作。然而,当我们的目标是将原型转化为真实的服务时,我们需要将至少部分代码移至后端,以控制资源和成本(例如API访问和费用)。
``` - Sure, here's the translated text in simplified Chinese:
```html
最后,我认为使用Jupyter笔记本的最大好处是:它就像拥有一个交互式文章,您可以在一个地方(彼此相邻)找到代码本身、代码的输出以及解释(在Markdown中),因此非常适合例如向其他开发人员传达机器学习/人工智能概念。
```
现在让我们开始建立我们的快速原型环境吧!记住,你只需要设置一次 :)。
Certainly, here is the translation in simplified Chinese while keeping the HTML structure: ```html
设置:Chocolatey
```在Windows系统中安装Chocolatey CLI
Sure, here's the translated text in simplified Chinese: ```html
正如我所提到的,Chocolatey是Windows的软件管理解决方案,我们将使用它来安装Python和Deno。我们需要Python来安装和运行Jupyter Lab IDE,而Deno为Jupyter Lab提供了Typescript语言支持。
```Sure, here is the translated text in simplified Chinese, keeping the HTML structure: ```html 如果你使用 Linux,请跳过这些步骤,直接进入安装 Python 和 Deno 的“在 Linux 上”部分。 ```
要安装Chocolatey,请从提升权限的命令提示符中执行以下命令(来源):
@"%SystemRoot%\System32\WindowsPowerShell\v1.0\powershell.exe" -NoProfile -InputFormat None -ExecutionPolicy Bypass -Command "[System.Net.ServicePointManager]::SecurityProtocol = 3072; iex ((New-Object System.Net.WebClient).DownloadString('https://community.chocolatey.org/install.ps1'))" && SET "PATH=%PATH%;%ALLUSERSPROFILE%\chocolatey\bin"
Sure, here's the translated text in simplified Chinese: 这个命令会下载并在您的计算机上运行远程的 install1.ps 脚本,因此在运行之前,请检查其内容以确保安全。
相关文章:Chocolatey文档:安装Chocolatey CLI
在保持HTML结构的前提下,将英文文本 "The most important Chocolatey CLI commands" 翻译为简体中文如下: ``` 最重要的Chocolatey命令行接口(CLI)命令 ```
- Sure, here's the translation in simplified Chinese:
```html
-localonly: 列出本地安装的软件包 ``` - choco install PackageName:安装一个包(您可以在社区包存储库中浏览可用的包)
- Sure, here's the HTML structure with the translated text: ```html choco upgrade PackageName: upgrades a package ```
- ```html
```
choco uninstall PackageName: uninstalls a package
- To translate the English text "choco outdated: list the locally installed packages that have a newer version" to simplified Chinese while keeping the HTML structure, you can use the following code: ```html choco outdated: list the locally installed packages that have a newer version ``` However, please note that HTML is not a translation tool, and using it to display translated text can be misleading. It's better to use proper translation tools or services for accurate translations.
在HTML结构中保持不变,将以下英文文本翻译为简体中文: 设置:安装Python和Deno
在Windows上
Sure, here's the translated text in simplified Chinese: ```html 在提升的命令提示符中,运行 choco install python 安装 Python。然后运行 refreshenv 命令刷新 PATH 和其他环境变量。现在如果运行 python --version,它会返回 Python 的版本。 ```
在HTML结构中,将以下英文文本翻译为简体中文: 运行python -m pip install -U pip以升级Python软件包管理器(pip)。
然后安装 Deno TypeScript 内核:
choco install deno
在Linux
在Linux上,您可以使用您的发行版的软件包管理器安装Python。然后运行python -m pip install -U pip来升级Python软件包管理器(pip)。
Sure, here's the translation: ```html 然后安装Deno TypeScript内核和Pnpm包管理器: ```
curl -fsSL https://deno.land/install.sh | sh
你应该在运行这些远程脚本文件之前,检查其内容以确保安全。
相关文章:
- Sure, here is the translation:
```html
安装 Deno 安装 Deno
```
Sure, here's how you can translate "Creating a Python virtual environment (venv)" into simplified Chinese while keeping the HTML structure: ```html 创建一个 Python 虚拟环境(venv) ```
以下是简体中文翻译的HTML结构: ```html
从这一点开始,Windows和Linux上的安装步骤非常相似,只需将/home/YourUser/用作您的主目录,而不是C:\Users\YourUser\。
```Sure, here is the translated text in simplified Chinese, while keeping the HTML structure: ```html
虚拟环境包含一组已安装的软件包。我建议为计算机上的每个基于 Python 的项目创建一个单独的虚拟环境,因此我们为 JupyterLab 和 Deno 创建一个新的虚拟环境。您可以随后创建额外的虚拟环境。
```在命令提示符(非提升权限)中打开,并为虚拟环境创建一个新目录:mkdir C:\Users\YourUser\venv,然后使用以下命令创建新的虚拟环境:python -m venv C:\Users\YourUser\venv\jupyter-deno
Sure, here is the translated text in simplified Chinese: 在我们使用 C:\Users\YourUser\venv\jupyter-deno\Scripts\activate 命令之前,我们必须激活虚拟环境,然后才能在其中安装包。执行此脚本后,提示符会更改为 (jupyter-deno) C:\。
相关文章:Python文档:虚拟环境的创建
Sure, here's the translated text in simplified Chinese within an HTML structure: ```html
最重要的Python包管理器(pip)命令
```- Sure, here is the translated text in simplified Chinese:
```html
pip列表:列出本地安装的软件包
``` - Sure, here is the translation in simplified Chinese while keeping the HTML structure:
```html
pip install PackageName: 安装一个包(您可以在Python包索引中浏览可用的包)
``` - ```html
pip install --upgrade PackageName: 升级一个包
``` - Sure, here's the translated text in simplified Chinese:
```html
pip uninstall PackageName: 卸载一个包
``` - Sure, here's the translated text in simplified Chinese:
```html
pip list --outdated: 列出本地安装的具有更新版本的软件包
```
HTML structure is not relevant for translating text, but I can provide the translation for "Setup: Installing JupyterLab with the Deno Kernel" in simplified Chinese: "安装设置:使用Deno内核安装JupyterLab"
在激活的环境中,我们安装 Jupyter Lab:pip install jupyterlab,然后使用 deno jupyter --unstable --install 命令将 Deno 内核添加到 Jupyter。
```html
默认情况下,Jupyter Lab 中不显示隐藏文件,所以例如我们无法在 Jupyter Lab 中看到 .env 文件。我们使用 .env 文件来存储 OpenAI API 的密钥。要在 Jupyter Lab 的文件管理器中显示这些文件,我们必须使用以下命令生成新的 Jupyter 配置文件:
```mkdir C:\Users\YourUser\.jupyter
cd C:\Users\YourUser\.jupyter
jupyter server --generate-config
Sure, here's the translated text in simplified Chinese: ```html
最后一个命令会生成一个 C:\Users\YourUser\.jupyter\jupyter_server_config.py 文件。打开此文件,将 ContentsManager.allow_hidden = True 设置为真。重新启动 Jupyter Lab,现在你可以使用“显示隐藏文件”菜单项在“视图”菜单中显示或隐藏 Jupyter Lab 中的隐藏文件。
```Sure, here's the translation: 作为安装过程的最后一步,创建一个用于Jupyter笔记本的目录并启动Jupyter Lab:
mkdir C:\Users\YourUser\jupyter
cd C:\Users\YourUser\jupyter
jupyter lab
Sure, here is the translation in simplified Chinese while keeping the HTML structure: ```html
相关文章:
``` This HTML snippet will display "相关文章:" in simplified Chinese.- Sure, here's the translation in simplified Chinese: ```html 带现代 JavaScript 到 Jupyter 笔记本 ```
- Sure, here's the translation:
```html
JupyterLab文档:显示隐藏文件 ```
HTML structure for the translated text: ```html
安装和使用Ollama:
``` This HTML code represents the translated text "安装和使用Ollama".在安装Ollama和一个模型
Sure, here's the translated text in simplified Chinese within the HTML structure: ```html
正如我之前提到的,我使用Ollama来运行本地LLM模型。
```Sure, here's the translated text in simplified Chinese: ```html 您可以在这里下载 Ollama 的 Windows 版,并在这里找到模型库。安装好 Ollama 后,我建议您下载 codellama:7b-code 模型,它非常适合测试用途:ollama pull codellama:7b-code。这是一个小型模型,大约需要 4GB 的内存。我在只有 16GB 内存和双核 CPU 的老笔记本上使用这个模型,并且它的响应速度还算可以接受。我也在“文本审核应用程序”的原型中使用了这个本地模型。 ```
Sure, here's the translation:
```html
最重要的Ollama命令:
```
- Sure, here is the translation in simplified Chinese:
```html
- 骆驼列表列出了已下载的模型
- Sure, here is the translated text in simplified Chinese, while maintaining the HTML structure: ```html ollama拉取模型名称:版本下载一个LLM模型 ```
- Sure, here's the translation in simplified Chinese within the HTML structure: ```html ollama 服务在后台运行Ollama服务器 ```
尝试使用本地模型测试我们的首个人工智能原型
```html 如果您还没有启动Jupyter Lab,请激活您的虚拟环境,并使用jupyter lab命令在其中启动Jupyter Lab。您可以在浏览器中打开UI:http://localhost:8888/。使用ollama serve启动Ollama。 ```
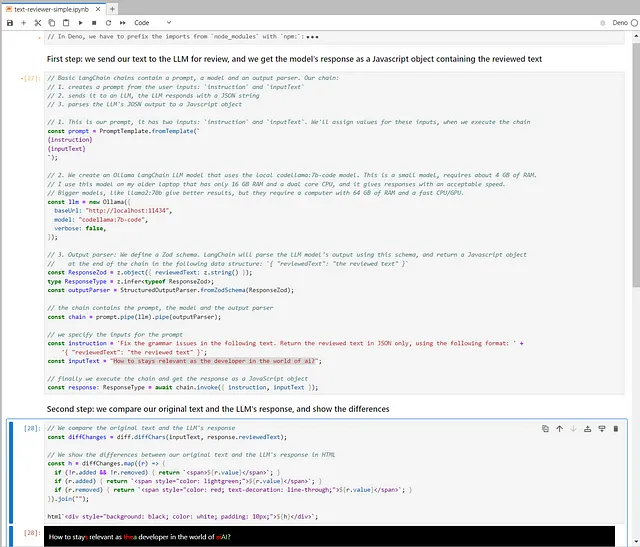
Sure, here's the translated text in simplified Chinese: ```html 下载包含应用程序原型的笔记本到C:\Users\YourUser\jupyter目录中。从JupyterLab的文件浏览器(屏幕左侧面板)中选择已下载的笔记本,然后从“编辑”菜单中选择“清除所有单元格的输出”以删除单元格中的所有保存输出,然后点击“运行所有单元格”菜单项。经过一些处理后,比较结果应该可见于最后一个单元格上方: ```

Sure, here's the translation: 接下来
Sure, here's the translation in simplified Chinese, keeping the HTML structure: ```html
在我文章系列的接下来部分,我将向您展示:
```- Sure, here's the translated text: ```html 如何使用 Jupyter Lab IDE 和 Deno JavaScript/TypeScript 运行时,在笔记本中执行 TypeScript 代码 ```
- 如何“文本审阅应用”原型(如上所示的屏幕截图)的工作
- Sure, here's the translation:
```html
LLMs和LangChain.js的基础。(LangChain使我们能够轻松切换不同的LLM模型和提供者API,如OpenAI平台API或本地的Ollama API。) LLMs和LangChain.js的基础。
LangChain使我们能够轻松切换不同的LLM模型和提供者API,如OpenAI平台API或本地的Ollama API。
``` - Sure, here is the translation in simplified Chinese while keeping the HTML structure:
```html
如何根据原型创建“文本审核应用”的状态和存储,以及使用人工智能进行代码生成,和
``` - 如何构建一个使用上述存储库的React和Angular应用
Sure, here's the translation in simplified Chinese while keeping the HTML structure:
```html
总结
```
Sure, here's the translated text in simplified Chinese: ```html
恭喜完成本小教程!我知道这可能不是你参与过的最令人兴奋的过程。但相信我,现在你拥有了一个强大的原型环境,可以用来实验构建人工智能工具。就像获得了制作美味餐点所需的所有食材(同时也在建造厨房:D)。在接下来的文章中,我们将开始烹饪,敬请关注有趣的部分!
``` Here's the translation without HTML structure: 恭喜完成本小教程!我知道这可能不是你参与过的最令人兴奋的过程。但相信我,现在你拥有了一个强大的原型环境,可以用来实验构建人工智能工具。就像获得了制作美味餐点所需的所有食材(同时也在建造厨房:D)。在接下来的文章中,我们将开始烹饪,敬请关注有趣的部分!Sure, here's the translated text in simplified Chinese within the HTML structure: ```html
在接下来的两篇文章中,我将解释如何使用 JupyterLab IDE 和 Deno JavaScript/TypeScript 运行时,并详细展示“文本审阅应用程序”原型的工作原理。
``` This HTML code will display the translated text while maintaining the structure.Sure, here's the translation:
```html
关于作者
```
关于作者
Sure, here's the HTML structure with the translated text: ```html
我的名字是Gergely Szerovay,我曾经担任数据科学家和全栈开发者多年,现在担任前端技术负责人,专注于基于Angular的前端开发。作为我的工作的一部分,我不断关注Angular和前端开发领域的发展。
Sure, here's the translation in simplified Chinese while keeping the HTML structure: ```html Angular 在过去几年中发展迅速,而在过去一年中,随着生成式人工智能的兴起,我们的软件开发工作流也迅速演变。为了紧密跟随 AI 辅助软件开发的演进,我决定开始公开构建人工智能工具,并在 AIBoosted.dev 上发布我的进展,点击这里订阅 🚀 ```
Sure, here's the translation: ```html 跟随我在Substack(Angular Addicts)、Substack(AIBoosted.dev)、Medium、Dev.to、X或LinkedIn上,了解更多关于Angular以及如何使用AI、Typescript、React和Angular构建AI应用的信息! ```