从视频中构建知识图谱的初学者指南
在深入探讨本文的技术方面之前,让我们先了解一下背景并回答你可能有的问题:什么是知识图谱?
并且为了回答这个问题,想象一下我们不是将知识存放在文件柜里,而是将它们存放在一个织物网中。每个事实、概念、关于人、地点、事件甚至抽象思想的信息都是系在一起的节点,它们之间的连线代表它们彼此之间的关系。这个复杂的网络,我的朋友们,就是知识图谱的本质。

把它想象成一张繁忙的城市地图,不仅仅展示街道,还揭示了地标、公园和商店之间的连接。同样,知识图谱不仅仅存储冷冰冰的事实;它还呈现了事物之间丰富的联系。例如,你可能会了解到玛丽·居里发现了镭,然后追踪线索发现镭被用于医疗治疗,而这又与医院和癌症研究相关。看到一个事实如何毫不费力地引导到另一个事实,勾勒出更大的画面了吗?
那么为什么这种以地图形式存储知识的方式如此受欢迎呢?嗯,想象一下在线搜索信息。传统方法往往只能给你提供零散的片段,就像仅仅在地图上找到建筑物而不知道它们之间的街道一样。然而,知识图谱将带领你展开一段旅程,引导你从一个事实到另一个,就像有一个友好的导游在信息世界的每个角落对你低声讲述着迷人的故事,很有趣吧?我知道。
自从我发现了这个神奇的东西,它就吸引了我的注意力,并且我探索和尝试了许多潜在的应用。在本文中,我将向您展示如何构建一个流水线,从视频中提取音频,然后将音频转录,并从转录中构建一个知识图,以便更细致和相互关联地表达视频中的信息。
我将使用Google Drive来上传视频示例。我还将使用Google Colab来编写代码,最后,您需要访问GPT Plus API来完成这个项目。我将把这个过程分解为几个步骤,以便初学者能够清楚、简单地理解:
- 设置一切。
- 从视频中提取音频。
- 将音频转写为文本。
- 构建知识图谱。
在本文结束时,您将构建一个具有以下架构的图表。
让我们直接开始吧!
设置一切
如上所述,我们将使用Google Drive和Colab。在第一个单元格中,让我们将Google Drive连接到Colab并创建我们的目录文件夹(video_files,audio_files,text_files)。以下代码可以完成此操作。(如果您想跟随代码进行操作,我已经将此项目的所有代码上传到GitHub;您可以从这里访问它。)
# installing required libraries
!pip install pydub
!pip install git+https://github.com/openai/whisper.git
!sudo apt update && sudo apt install ffmpeg
!pip install networkx matplotlib
!pip install openai
!pip install requests

# connecting google drive to import video samples

from google.colab import drive
import os
drive.mount('/content/drive')

video_files = '/content/drive/My Drive/video_files'
audio_files = '/content/drive/My Drive/audio_files'
text_files = '/content/drive/My Drive/text_files'

folders = [video_files, audio_files, text_files]
for folder in folders:
    # Check if the output folder exists
    if not os.path.exists(folder):
    # If not, create the folder
        os.makedirs(folder)
您也可以手动创建文件夹,并将您的视频样本上传到“video_files”文件夹中,无论哪种方式对您来说更容易。
现在我们在“video_files”文件夹中有三个文件夹和一个视频示例,以便测试代码。
2- 从视频中提取音频
下一步,我们想要做的是导入视频并从中提取音频。我们可以使用Pydub库,这是一个高级音频处理库,可以帮助我们实现这一目标。让我们来看一下代码,然后在下面进行解释。
from pydub import AudioSegment
# Extract audio from videos
for video_file in os.listdir(video_files):
    if video_file.endswith('.mp4'):
        video_path = os.path.join(video_files, video_file)
        audio = AudioSegment.from_file(video_path, format="mp4")

        # Save audio as WAV
        audio.export(os.path.join(audio_files, f"{video_file[:-4]}.wav"), format="wav")
安装了我们的pydub包后,我们从Pydub库导入了AudioSegment类。然后,我们创建了一个循环,遍历之前创建的“video_files”文件夹中的所有视频文件,并将每个文件通过AudioSegment.from_file传递以从视频文件中加载音频。加载的音频然后使用audio.export导出为WAV文件,并保存在指定的“audio_files”文件夹中,文件名与视频文件相同,但扩展名为.wav。
在此时,您可以转到Google Drive中的“audio_files”文件夹,您将看到提取的音频。
3- 转录音频为文本
在第三步中,我们将把我们拥有的音频文件转录成文本文件,并将其保存为“text_files”文件夹中的.txt文件。在这里,我使用了来自OpenAI的Whisper ASR(自动语音识别)系统来完成这个任务。我选择它是因为它容易使用且相当准确,此外它还为不同的准确度提供了不同的模型。但是,模型越准确,加载速度就越慢,因此我将仅使用中等准确度的模型进行演示。为了使代码更清晰,让我们创建一个函数来转录音频,然后使用循环将该函数应用于我们目录中的所有音频文件。
import re
import subprocess
# function to transcribe and save the output in txt file
def transcribe_and_save(audio_files, text_files, model='medium.en'):
    # Construct the Whisper command
    whisper_command = f"whisper '{audio_files}' --model {model}"
    # Run the Whisper command
    transcription = subprocess.check_output(whisper_command, shell=True, text=True)

    # Clean and join the sentences
    output_without_time = re.sub(r'\[\d+:\d+\.\d+ --> \d+:\d+\.\d+\]  ', '', transcription)
    sentences = [line.strip() for line in output_without_time.split('\n') if line.strip()]
    joined_text = ' '.join(sentences)

    # Create the corresponding text file name
    audio_file_name = os.path.basename(audio_files)
    text_file_name = os.path.splitext(audio_file_name)[0] + '.txt'
    file_path = os.path.join(text_files, text_file_name)

    # Save the output as a txt file
    with open(file_path, 'w') as file:
        file.write(joined_text)

    print(f'Text for {audio_file_name} has been saved to: {file_path}')


# Transcribing all the audio files in the directory
for audio_file in os.listdir(audio_files):
    if audio_file.endswith('.wav'):
        audio_files = os.path.join(audio_files, audio_file)
        transcribe_and_save(audio_files, text_files)
使用的库:
- os: 提供与操作系统交互的方式,用于处理文件路径和名称。
- 关于正则表达式模块用于模式匹配和替换的问题。
- subprocess:允许创建额外的进程,在此处用于从命令行执行Whisper ASR系统。
我们创建了一个Whisper命令,并将其保存为变量以便于处理。之后,我们使用subprocess.check_output来运行Whisper命令,并将得到的转录保存在transcription变量中。但是此时的转录并不干净(可以通过在函数外打印transcription变量来检查,它包含时间戳和几行与转录无关的内容),所以我们添加了一个清理代码,使用re.sub去除时间戳,并将句子连接起来。之后,我们在“text_files”文件夹中创建了一个与音频文件同名的文本文件,并将清理后的转录保存在其中。
现在,如果你进入“text_files”文件夹,你可以看到包含转录的文本文件。哇,第三步成功完成!恭喜你!
4- 构建知识图谱
这是关键部分 - 也许是最长的部分。我将采用模块化的方法来处理这个任务,使用5个函数,但在此之前,让我们从必要的库和模块开始,用于发出HTTP请求,处理JSON,使用数据框架pandas,创建和可视化图形networkx和matplotlib。还设置了全局常量,这些常量是代码中使用的变量。API_ENDPOINT是OpenAI API的终点,API_KEY是存储OpenAI API密钥的位置,prompt_text将存储用作OpenAI提示输入的文本。所有这些都在这段代码中完成。
import requests
import json
import pandas as pd
import networkx as nx
import matplotlib.pyplot as plt

# Global Constants API endpoint, API key, prompt text
API_ENDPOINT = "https://api.openai.com/v1/chat/completions"
api_key = "your_openai_api_key_goes_here"
prompt_text = """Given a prompt, extrapolate as many relationships as possible from it and provide a list of updates.
If an update is a relationship, provide [ENTITY 1, RELATIONSHIP, ENTITY 2]. The relationship is directed, so the order matters.
Example:
prompt: Sun is the source of solar energy. It is also the source of Vitamin D.
updates:
[["Sun", "source of", "solar energy"],["Sun","source of", "Vitamin D"]]
prompt: $prompt
updates:"""
然后让我们继续分解我们函数的结构:
第一个函数create_graph()的任务是使用networkx库创建一个图形可视化。它接受一个DataFrame df和一个边标签字典rel_labels(将在下一个函数中创建)作为输入。然后,它使用DataFrame创建一个有向图,并使用matplotlib进行一些自定义的可视化,输出我们所需的美观的图形。
# Graph Creation Function

def create_graph(df, rel_labels):
    G = nx.from_pandas_edgelist(df, "source", "target",
                              edge_attr=True, create_using=nx.MultiDiGraph())
    plt.figure(figsize=(12, 12))

    pos = nx.spring_layout(G)
    nx.draw(G, with_labels=True, node_color='skyblue', edge_cmap=plt.cm.Blues, pos=pos)
    nx.draw_networkx_edge_labels(
        G,
        pos,
        edge_labels=rel_labels,
        font_color='red'
    )
    plt.show()
df 数据帧和边标签 rel_labels 是下一个函数 preparing_data_for_graph() 的输出结果,该函数接受 OpenAI api_response 作为输入,并从中提取实体-关系三元组(源、目标、边)。在这里,我们使用 json 模块解析响应并获取相关数据,然后过滤掉缺失数据的元素。接着,从这些三元组构建知识库数据帧 kg_df,最后,创建一个字典(relation_labels),将节点对与其对应的边标签进行映射,并且当然,返回数据帧和字典。
# Data Preparation Function

def preparing_data_for_graph(api_response):
    #extract response text
    response_text = api_response.text
    entity_relation_lst = json.loads(json.loads(response_text)["choices"][0]["text"])
    entity_relation_lst = [x for x in entity_relation_lst if len(x) == 3]
    source = [i[0] for i in entity_relation_lst]
    target = [i[2] for i in entity_relation_lst]
    relations = [i[1] for i in entity_relation_lst]

    kg_df = pd.DataFrame({'source': source, 'target': target, 'edge': relations})
    relation_labels = dict(zip(zip(kg_df.source, kg_df.target), kg_df.edge))
    return kg_df,relation_labels
第三个功能是call_gpt_api(),它负责向OpenAI API发出POST请求并输出api_response。在这里,我们使用模型信息、提示和其他参数(如模型(在本例中为gpt-3.5-turbo-instruct)、max_tokens、stop和temperature)构造数据负载。然后使用requests.post发送请求并返回响应。我还包括了简单的错误处理,以便在发生异常时打印错误消息。try块包含可能在执行期间引发请求异常的代码,因此如果在此过程中发生异常(例如由于网络问题、API错误等),则将执行except块中的代码。
# OpenAI API Call Function
def call_gpt_api(api_key, prompt_text):
    global API_ENDPOINT
    try:
        data = {
            "model": "gpt-3.5-turbo",
            "prompt": prompt_text,
            "max_tokens": 3000,
            "stop": "\n",
            "temperature": 0
        }
        headers = {"Content-Type": "application/json", "Authorization": "Bearer " + api_key}
        r = requests.post(url=API_ENDPOINT, headers=headers, json=data)
        response_data = r.json()  # Parse the response as JSON
        print("Response content:", response_data)
        return response_data
    except Exception as e:
        print("Error:", e)
然后,倒数第二个函数是main()函数,它负责脚本的主要流程。首先,它从之前的“text_files”文件夹中读取文本文件内容,并将其保存在变量kb_text中。调用全局变量prompt_text,该变量存储我们的提示,并使用文本文件内容kb_text替换提示模板中的占位符($prompt)。然后调用call_gpt_api()函数,将api_key和prompt_text作为参数传递,以获取OpenAI API的响应。然后将响应传递给preparing_data_for_graph()函数,以准备数据并获取DataFrame和边缘标签字典,最后将这两个值传递给create_graph()函数来构建知识图。
# Main function

def main(text_file_path, api_key):

    with open(file_path, 'r') as file:
        kb_text = file.read()

    global prompt_text
    prompt_text = prompt_text.replace("$prompt", kb_text)

    api_response = call_gpt_api(api_key, prompt_text)
    df, rel_labels = preparing_data_for_graph(api_response)
    create_graph(df, rel_labels)code
最后,我们有了start()函数,它遍历我们“text_files”文件夹中的所有文本文件 - 如果我们有多个文件,获取文件的名称和路径,并将其与api_key一起传递给主函数以完成其工作。
# Start Function

def start():
    for filename in os.listdir(text_files):
        if filename.endswith(".txt"):
        # Construct the full path to the text file
            text_file_path = os.path.join(text_files, filename)
    main(text_file_path, api_key)
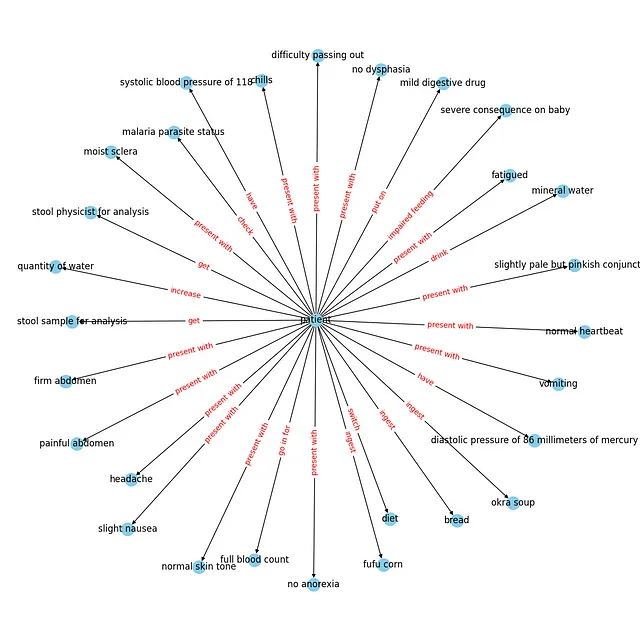
如果您正确地按照步骤操作,在运行start()函数后,您应该能够看到一个类似的可视化界面。
您当然可以将这个知识图保存在Neo4j数据库中,并进一步进行使用。
概要:
知识图谱利用语义关系来表示数据,从而实现更细致和上下文感知的理解。这种语义丰富性允许进行更复杂的查询和分析,因为实体之间的关系被明确定义。
在这篇文章中,我详细概述了构建一个涉及从视频中提取音频、使用OpenAI的Whisper ASR进行转录,并创建一个知识图谱的流程。作为对这个领域感兴趣的人,我希望本文可以让初学者更容易理解,展示知识图谱应用的潜力和多样性。
并且一如既往地,整个代码在GitHub上都是可用的。