如何创建您自己的chatGPT插件?
ChatGPT插件是与ChatGPT一起使用的令人兴奋的工具。在本文中,我将为您介绍创建您自己的ChatGPT插件的关键步骤。那么,让我们开始吧。
让我先解释一下chatGPT,以防您第一次听说它。chatGPT是基于大量信息/内容构建的模型,换句话说,它是基于热门内容构建的。通过这个模型,您可以以对话的方式与它进行交互。很棒对吧?现在我们知道它可以与已经使用的内容互动,但是如果我想要一些实时数据或者想要通过chatGPT访问我的网站内容呢?这就是chatGPT插件的用处。ChatGPT插件可以帮助我访问实时数据,比如天气情况、股票价格等等... 假设我有一家餐厅,我希望我的客户可以通过chatGPT访问我的菜单,chatGPT插件也可以做到这一点。
在我们的chatGPT插件中,我将专注于获取实时天气状况。通常,构建chatGPT插件需要理解清单文件和openai规范文件。清单文件将帮助chatGPT识别您的插件,而类似于Swagger文档的openai规范文件则提供了有关您的端点(API)的基本解释。
嗯,我希望你现在有了想法,让我们开始编码吧。
先决条件:
- OpenWeatherMap API密钥
- 聊天GPT Plus
- 已接受聊天GPT插件开发者访问权限(可选)
- 关于JavaScript或TypeScript的知识。
现在,在nodejs中创建一个普通的应用程序,并尝试让基础路由“/”正常。或者您可以使用我的代码:) 自由使用typescript。
用“npm init”初始化你的应用程序。
安装依赖项,在我的情况下,这是我在package.json中拥有的内容。
{
  "name": "chatGPTPlugin",
  "version": "1.0.0",
  "description": "A chat GPT Plugin",
  "main": "index.js",
  "scripts": {
    "test": "echo \"Error: no test specified\" && exit 1",
    "start": "node src/index.js",
    "build": "babel src -d build",
    "dev": "env-cmd -f .env nodemon --ignore --exec babel-node ./src/index.js"
  },
  "type": "module",
  "license": "ISC",
  "dependencies": {
    "axios": "^1.4.0",
    "env-cmd": "^10.1.0",
    "express": "^4.18.2",
    "@babel/cli": "^7.21.0",
    "@babel/core": "^7.21.0",
    "@babel/node": "^7.20.7",
    "@babel/preset-env": "^7.20.2"
  },
  "devDependencies": {
  },
  "author": "Chance Desire IRADUKUNDA"
}
然后在您的文件夹根目录下创建 .babelrc,.env 和 .gitignore。
{
    "presets": [
        [
            "@babel/preset-env", {
                "targets": {
                    "node": "current"
                }
            }
        ]
    ]
}
.git忽略文件
/node_modules
.env
/build
请在您的根目录下创建一个名为 src/ 的文件夹,然后在 src/ 中创建 .well-known/ 和 routers/ 文件夹,并在同一级别上创建 index.js 和 openai.yaml 文件。
在index.js中先使用这些代码。
import express from "express";

const app = express();
const PORT = process.env.PORT || 4000;


app.use(express.json({ extended: false }));

app.get("/", (req, res) => {
  res.status(200).send("Get Weather Plugin");
});


app.listen(PORT, () => {
  console.log(`Server is running on Port ${PORT}`);
});
然后尝试通过“npm run dev”运行应用程序。
我们正在初始化基础路由,现在开始chatGPT插件逻辑。在.well-known文件夹下创建ai-plugin.json文件。这个文件是我们的清单文件。
这个文件将会有这些代码。
注:由于您尚未在 URL 上托管您的应用程序,因此您将使用 localhost,然后在托管应用程序后使用托管的链接。
"url": "http://localhost:4000/.well-known/openai.yaml"
{
    "schema_version": "v1",
    "name_for_human": "Get Weather Plugin",
    "name_for_model": "get_weather",
    "description_for_human": "Plugin for searching weather condition using Open Weather Map API. You can get any country's or city's weather status.",
    "description_for_model": "Plugin for searching weather condition using Open Weather Map API. You can get any country's or city's weather status. 'get weather at {search}'",
    "auth": {
      "type": "none"
    },
    "api": {
      "type": "openapi",
      "url": "https://funny-blue-dibbler.cyclic.app/.well-known/openai.yaml",
      "is_user_authenticated": false
    },
    "logo_url": "PLUGIN_HOSTNAME/logo.png",
    "contact_email": "support@example.com",
    "legal_info_url": "https://example.com/legal"
  }
在 routers/ 文件夹下创建 get-weather.js 文件。在此文件中,我们从一个端点调用实时天气状态。记得使用你自己的 API 密钥。
import express from "express";
import axios from "axios";

const router = express.Router();

router.get("/", async (req, res) => {
  const { search } = req.query;
  try {
    const api = {
      key: process.env.API_KEY,
      base: "https://api.openweathermap.org/data/2.5/"
    }
    const response = await axios.get(`${api.base}weather?q=${search}&units=metric&APPID=${api.key}`)
    res.json(response.data);
  } catch (error) {
    console.error(error);
    res.status(500).send({
      msg: "error making request",
    });
  }
});

export default router;
然后在我们的OpenAI规范文件openai.yaml中。
注意:由于您尚未将应用托管在 URL 上,您将使用 localhost,然后在托管应用后使用托管链接。
"url": "http://localhost:4000"
openapi: 3.0.1
info:
  title: Get Weather Plugin
  description: Plugin for searching weather condition using ChatGPT.
  version: "v1"
servers:
  - url: https://funny-blue-dibbler.cyclic.app
paths:
  /api/v1/get-weather:
    get:
      operationId: getWeather
      summary: Get the current weather for a specific location
      parameters:
        - in: query
          name: search
          schema:
            type: string
          description: The location to get the weather for
      responses:
        "200":
          description: OK
          content:
            application/json:
              schema:
                $ref: "#/components/schemas/getWeatherResponse"
        "500":
          description: Error making request
          content:
            application/json:
              schema:
                $ref: "#/components/schemas/errorResponse"
components:
  schemas:
    getWeatherResponse:
      type: object
      properties:
        weather:
          type: object
          properties:
            name:
              type: string
            main:
              type: object
              properties:
                temp:
                  type: number
            weather:
              type: array
              items:
                type: object
                properties:
                  main:
                    type: string
                  description:
                    type: string
    errorResponse:
      type: object
      properties:
        message:
          type: string
最后,在我们的index.js文件中更新,使其能够识别我们的清单和规范文件。
import path from "path";
import { fileURLToPath } from "url";
import express from "express";
import getweatherRoute from "./routers/get-weather.js";

const app = express();
const PORT = process.env.PORT || 4000;
const __dirname = path.dirname(fileURLToPath(import.meta.url));

app.use(express.json({ extended: false }));

app.get("/", (req, res) => {
  res.status(200).send("Get Weather Plugin");
});

app.get("/.well-known/ai-plugin.json", (req, res) => {
  const filePath = path.join(__dirname, "/.well-known/ai-plugin.json");

  res.sendFile(filePath, function (err) {
    if (err) {
      console.error(err);
      res.status(500).send({
        msg: "error sending file",
      });
    } else {
      console.log("Sent:", filePath);
    }
  });
});

app.get("/.well-known/openai.yaml", (req, res) => {
  const filePath = path.join(__dirname, "/openai.yaml");

  res.sendFile(filePath, function (err) {
    if (err) {
      console.error(err);
      res.status(500).send({
        msg: "error sending file",
      });
    } else {
      console.log("Sent:", filePath);
    }
  });
});

app.use("/api/v1/get-weather", getweatherRoute);

app.listen(PORT, () => {
  console.log(`Server is running on Port ${PORT}`);
});
运行npm run dev命令来查看应用是否仍在运行。并且记得要托管你的应用(可选)。
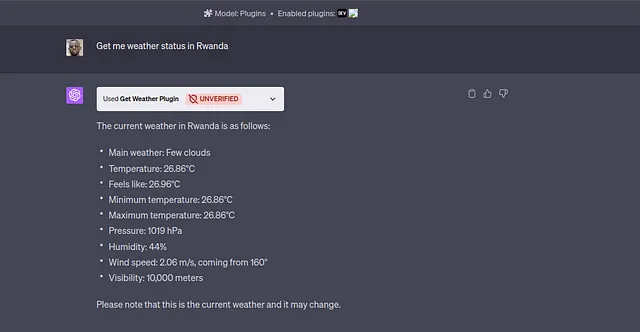
如果一切正常,请前往您的chatGPT商店,然后选择“开发自己的插件”,并粘贴托管链接或运行应用程序的本地主机。如果插件被识别,请使用任何国家的提示“获取卢旺达的天气状况”。在我的情况下,我使用了我的国家:)
这就是构建天气聊天GPT插件所需要的所有内容,谢谢 :)
愉快编码。
GitHub: 源代码
YouTube:视频