使用OpenAI的GPT-3语言模型构建AI医疗健康助手
在医疗保健领域,每一秒钟都至关重要,获取准确可靠的医疗信息至关重要。但如果我们可以更进一步,拥有一个可以在几秒钟内提供专业医疗建议的AI助手,该怎么办?这就是我们将使用OpenAI的GPT-3语言模型构建的工具。在这篇博客中,我们将介绍构建医学健康助手API的过程,该API使用OpenAI的GPT-3语言模型提供专业医疗建议。我们将使用Node.js、Express和OpenAI API来构建这个助手。在我们深入代码之前,让我们首先了解一下这个医学健康助手的概念。这个助手的想法是为那些无法去看医生或需要快速回答的患者提供医疗建议。如果疾病可以用家庭疗法治疗,助手将能够提供自我诊断选项。
先决条件
为跟随本教程,您将需要:
- 基本理解HTML,CSS和JavaScript和Node js。
- 安装在你电脑上的文本编辑器,例如Visual Studio Code或Sublime Text。
- Visual Studio Code 实时服务器扩展
在我们着手编码之前,我们需要确保已安装必要的工具。我们需要有:
- Node js
- npm
如果您还没有安装Node.js,您可以从官方Node.js网站下载。
建立项目的步骤如下:
- 为我们的项目创建一个新文件夹。
- 在终端中导航到该文件夹。
运行以下命令来初始化一个新的Node.js项目:
npm init -y这将在我们的项目目录中创建一个package.json文件。此文件将存储有关我们的项目的信息,例如其名称,版本和依赖关系。
我们的项目文件夹应该看起来像这样:
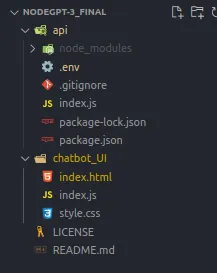
该项目有两个子文件夹,api和chatbot_UI。顾名思义,api负责聊天机器人的api请求。chatbot_UI文件夹包含用户与之交互的用户界面。
一旦我们的项目设置好,就可以开始编码了!
第一步是在api文件夹的index.js文件中导入所需的库和模块。
const { Configuration, OpenAIApi } = require('openai');
const express = require('express');
const bodyParser = require('body-parser');
const cors = require('cors');
require('dotenv').config();
我们将使用openai模块与OpenAI API通讯。我们还需要使用express模块来创建API,使用body-parser模块来解析传入的请求,以及cors模块来处理跨域资源共享。最后,我们使用dotenv来加载环境变量。接下来,我们创建express应用程序并设置中间件:
const app = express();
app.use(bodyParser.json());
app.use(cors());
我们正在使用 body-parser 来解析带有 JSON 负载的传入请求,并使用 cors 来启用跨域资源共享。现在,让我们设置我们的 OpenAI API 凭证:
const config = new Configuration({
  apiKey: process.env.OPENAI_KEY
});

const openai = new OpenAIApi(config);
我们使用 process.env.OPENAI_KEY 从环境变量中加载我们的 OpenAI API 密钥创建了一个新的 Configuration 实例。然后,我们将此配置传递给创建一个新的 OpenAIApi 类实例的过程。
现在我们已经设置了我们的中间件和API凭据,让我们创建我们的端点。我们从根端点开始,它只是返回一个欢迎消息:
app.get('/', (req, res) => {
  res.send('Welcome to the Medical Health Assistant API with GPT-3 language model');
});
当根URL进行GET请求时,此端点返回简单的欢迎消息。接下来,我们定义我们的提示,这将用作每条消息的基本提示:
const prompt = `You are an AI assistant that is an expert in medical health and is part of a hospital system called medicare AI
You know about symptoms and signs of various types of illnesses.
You can provide expert advice on self-diagnosis options in the case where an illness can be treated using a home remedy.
If a query requires serious medical attention with a doctor, recommend them to book an appointment with our doctors
If you are asked a question that is not related to medical health respond with "Im sorry but your question is beyond my functionalities".
Do not use external URLs or blogs to refer
Format any lists on individual lines with a dash and a space in front of each line.

>`;
这定义了一个常量,其中包含将用于从 GPT-3 语言模型生成响应的提示。
现在我们已经定义了提示,让我们继续处理消息处理。我们定义一个POST端点/ message以接收传入消息并使用GPT-3模型生成响应:
app.post('/message', (req, res) => {
  const response = openai.createCompletion({
    model: 'text-davinci-003',
    prompt: prompt + req.body.message,
    temperature: 0.5,
    max_tokens: 1024,
    top_p: 1,
    frequency_penalty: 0,
    presence_penalty: 0
  });

  response
    .then((data) => {
      const message = { message: data.data.choices[0].text };
      res.send(message);
    })
    .catch((err) => {
      res.send(err);
    });
});
此端点接收一个包含消息的POST请求。我们使用openai.createCompletion()方法从GPT-3模型生成响应。该方法带有各种参数,如模型,提示,温度,最大标记,top_p,频率惩罚和存在惩罚。这些参数影响响应生成过程的行为。
一旦我们收到 GPT-3 模型的响应,我们会提取生成的消息并将其作为响应发送回客户端。
最后,我们通过监听特定的端口(在这种情况下,端口3000)来启动服务器。
app.listen(3000, () => console.log('Listening on port 3000'));聊天机器人界面
HTML代码设置了聊天机器人的基本结构。它包括一个标题、一个视口元标记用于响应性、一个链接到CSS文件和主体内容:
<html>
  <head>
    <title>GPT-3</title>
    <meta name="viewport" content="width=device-width, initial-scale=1.0" />
    <link rel="stylesheet" href="style.css" />
  </head>
  <body>
    <div class="chat-box">
        <!-- Chat Box Header -->
        <div class="chat-box-header"> AI chat</div>

        <!-- Chat Box Body -->
        <div class="chat-box-body">
          <div class="response">
            <span>Hello there, how can I help you today?</span>
          </div>
        </div>

        <!-- Chat Box Footer -->
        <div class="chat-box-footer">
          <input type="text" class="input-box" placeholder="Ask a question..." />
          <button>Send</button>
        </div>
    </div>

    <script src="index.js"></script>
  </body>
</html>
@import url('https://fonts.googleapis.com/css2?family=Roboto:wght@400;700&display=swap');
/* Add a background color to the chat screen */
body {
font-family: 'Roboto', sans-serif;
background: #E8EBF5;
background-size: cover;
background-position: center center;
}
#loading {
font-size: 30px;
}
/* Style the chat box */
.chat-box {
margin: 80px auto;
width: 400px;
max-width: 100%;
background-color: #ffffff;
border-radius: 8px;
box-shadow: 0 4px 8px rgba(0, 0, 0, 0.1);
overflow: hidden
height: 600px;
}
/* Style the chat box header */
.chat-box-header {
background-color: #846c38;
color: #ffffff;
padding: 16px;
font-size: 20px;
font-weight: bold;
border-top-left-radius: 8px;
border-top-right-radius: 8px;
}
/* Style the chat box body */
.chat-box-body {
padding: 16px;
overflow-y: auto;
height: calc(100% - 145px);
}
/* Style the chat messages */
.chat-box-body .message,
.chat-box-body .response {
margin-bottom: 16px;
}
.message {
color: rgb(44, 41, 41);
font-family: Helvetica;
font-size: 16px;
font-weight: normal;
text-align: right;
clear: both;
}
.message span {
line-height: 1.5em;
display: inline-block;
background: #F0EEED;
padding: 20px;
border-radius: 8px;
border-bottom-right-radius: 2px;
max-width: 80%;
margin-right: 10px;
animation: floatup .5s forwards
}
/* Style the chatbot's responses */
.response {
color: white;
font-family: Helvetica;
font-weight: normal;
font-size: 16px;
text-align: left;
}
.response {
line-height: 1.5em;
display: inline-block;
background: #0084ff;
padding: 10px;
border-radius: 8px;
border-bottom-left-radius: 2px;
max-width: 80%;
margin-left: 10px;
}
/* Style the chat box footer */
.chat-box-footer {
bottom: 0;
display: flex;
align-items: center;
background-color: #846c38;
border-top: 1px solid #846c38;
padding: 8px 16px;
}
/* Style the input field */
.chat-box-footer input[type="text"] {
flex: 1;
padding: 8px;
border: 1px solid #846c38;
border-radius: 8px;
font-size: 16px;
outline: none;
}
/* Style the button */
.chat-box-footer button {
margin-left: 8px;
padding: 8px 16px;
background-color: #0084ff;
color: #ffffff;
font-size: 16px;
font-weight: bold;
border: none;
border-radius: 8px;
cursor: pointer;
}
/* Add some hover effects to the button */
.chat-box-footer button:hover {
background-color: #0073e6;
}
.chat-box-footer button:active {
background-color: #005bbf;
}style.css 文件提供的 CSS 代码为聊天机器人及其组件添加样式。它定义了聊天框界面的布局、颜色、字体和动画。
JavaScript代码处理聊天机器人功能。它监听用户交互,如点击发送按钮或按下回车键,并将用户的消息发送到服务器进行处理:
const chatBox = document.querySelector(".chat-box");
const inputField = chatBox.querySelector("input[type='text']");
const button = chatBox.querySelector("button");
const chatBoxBody = chatBox.querySelector(".chat-box-body");

// Send message on button click
button.addEventListener("click", sendMessage);

// Send message on enter key press
inputField.addEventListener("keypress", function(event) {
  if (event.key === "Enter") {
    sendMessage();
  }
});

function sendMessage() {
  const message = inputField.value;
  inputField.value = "";
  chatBoxBody.innerHTML += `<div class="message"><span>${message}</span></div>`;
  chatBoxBody.innerHTML += `<div id="loading" class="response loading">.</div>`;
  scrollToBottom();

  // Simulating loading animation with dots
  window.dotsGoingUp = true;
  var dots = window.setInterval(function() {
    var wait = document.getElementById("loading");
    if (window.dotsGoingUp)
        wait.innerHTML += ".";
    else {
        wait.innerHTML = wait.innerHTML.substring(1, wait.innerHTML.length);
        if (wait.innerHTML.length < 2)
            window.dotsGoingUp = true;
    }
    if (wait.innerHTML.length > 3)
        window.dotsGoingUp = false;
  }, 250);

  fetch('http://localhost:3000/message', {
    method: 'POST',
    headers: {
      accept: 'application.json',
      'Content-Type': 'application/json'
    },
    body: JSON.stringify({message})
  }).then(response => {
    return response.json();
  }).then(data => {
    document.getElementById("loading").remove();
    chatBoxBody.innerHTML += `<div class="response"><p>${data.message}</p></div>`;
    scrollToBottom();
  })
}

// Function to scroll to the bottom of the chatbox
function scrollToBottom() {
  chatBoxBody.scrollTop = chatBoxBody.scrollHeight;
}
为运行聊天机器人,打开VSCode终端,导航至API文件夹并运行命令:
node index.js这将会在3000端口开始监听。

运行聊天机器人,请按照以下步骤进行:
- 导航到chatbot_UI文件夹。
- 通过点击“启动”以实时服务器打开它。
此操作将在您的机器上启动一个端口并提供聊天机器人界面。
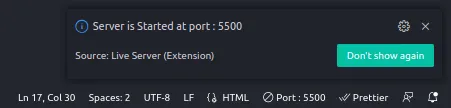
在浏览器上打开上述端口即可启动我们的聊天机器人。
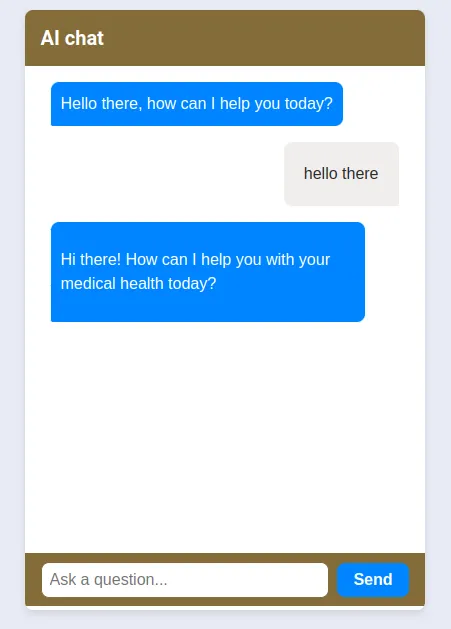
那就是它!我们已经设置好了基本的聊天机器人,可以处理传入的消息,使用GPT-3模型生成响应,并将生成的响应发送回客户端。
总之,我们已经走过了使用OpenAI的GPT-3语言模型构建医疗健康助手API的过程。这个AI助手可以提供专业的医疗建议,自我诊断选项。借助GPT-3的力量,我们可以增强医疗保健的可及性,并为有需要的人提供快速的医疗援助。